> ## Documentation Index
> Fetch the complete documentation index at: https://shipmagic-docs.speedysquirrelhq.com/llms.txt
> Use this file to discover all available pages before exploring further.
# Quickstart
> Get up and running quickly by creating your first rule in 5 minutes
This guide covers the basic setup steps to help you get started with ShipMagic. For detailed instructions on each feature, refer to the [Shipping Rates](/shipping-rates/basic-shipping-rate) and [Shipping Customization](/shipping-customizations/basic-shipping-customization) sections.
Not sure whether to use Shipping Rates or Shipping Customizations? Follow [this](/core-concepts/rates-vs-customizations) guide to choose the right option for your needs.
## Shipping Rates
In this guide, we’ll set up a basic shipping configuration with two types of products: regular and bulky.
| Products | Shipping Rate |
| ---------------------------- | ---------------------------------------------------------------------------------------------------------------------------- |
| Products with tag "bulky" | 10% of the product cost |
| Products without tag "bulky" | - Flat \$5 below \$100 worth of regular products
- Free shipping above \$100 worth of regular products
|
Install and open ShipMagic in your Shopify admin.
From the left navigation panel, open the **Shipping Rates** page.\
We’ll create two rules here:
* One for **bulky products**
* One for **regular products**
Click on "Add Rule" and create a rule with following condition:
```text theme={null}
Name: Bulky Products
Priority: 1
Rule must match: All conditions
Condition 1: Product Tag <> Equals <> bulky
```
In your desired shipping zone, click on "Add rate" and add a rate with following details:
```text theme={null}
Name: Standard Shipping
Calculaion Parameter: Percentage of total price
Percentage: 10
```
Click "Done" and then "Save" the rule.
Click on "Add Rule" to create another. Add following condition:
```text theme={null}
Name: Regular Products
Priority: 1
Rule must match: All conditions
Condition 1: Product Tag <> Not Equals <> bulky
```
In your desired shipping zone, click on "Add rate" and add the first rate below \$100:
```text theme={null}
Name: Standard Shipping
Calculaion Parameter: Total price of items
Type: Range
Range Start: 0
Range End: 100
Price: 5
```
Click on "Add Rate" again to add the second rate above \$100.
```text theme={null}
Name: Standard Shipping
Calculaion Parameter: Total price of items
Type: Range
Range Start: 100.01
Range End: LEAVE EMPTY
Price: 0
```
Click "Done" and then "Save" the rule.
[Some product data](/core-concepts/syncing-products) isn’t available at checkout during runtime, so syncing product data during rule set up is required. Product tag is one such parameter.
* Go to **Settings** page in the app
* Click **“Sync Now”** under **Products**
Sync will run in the background, you can leave the page.
1. Go to your Shopify storefront
2. Add a product tagged **“bulky”** to the cart
3. Proceed to checkout
4. Enter the complete address. First name should be **“shipmagic”** if app is in [test mode](https://shipmagic-docs.speedysquirrelhq.com/core-concepts/testing-the-app).
You should now see the shipping rates calculated by ShipMagic based on the rules we configured above.
## Shipping Customizations
In this guide, we’ll set up a basic shipping customization to show free shipping to customers who have a tag "prime" and paid shipping options to others.
Install and open ShipMagic in your Shopify admin.
Navigate to Store settings → Shipping and Delivery → General. Add the following rates in the desired shipping zone.
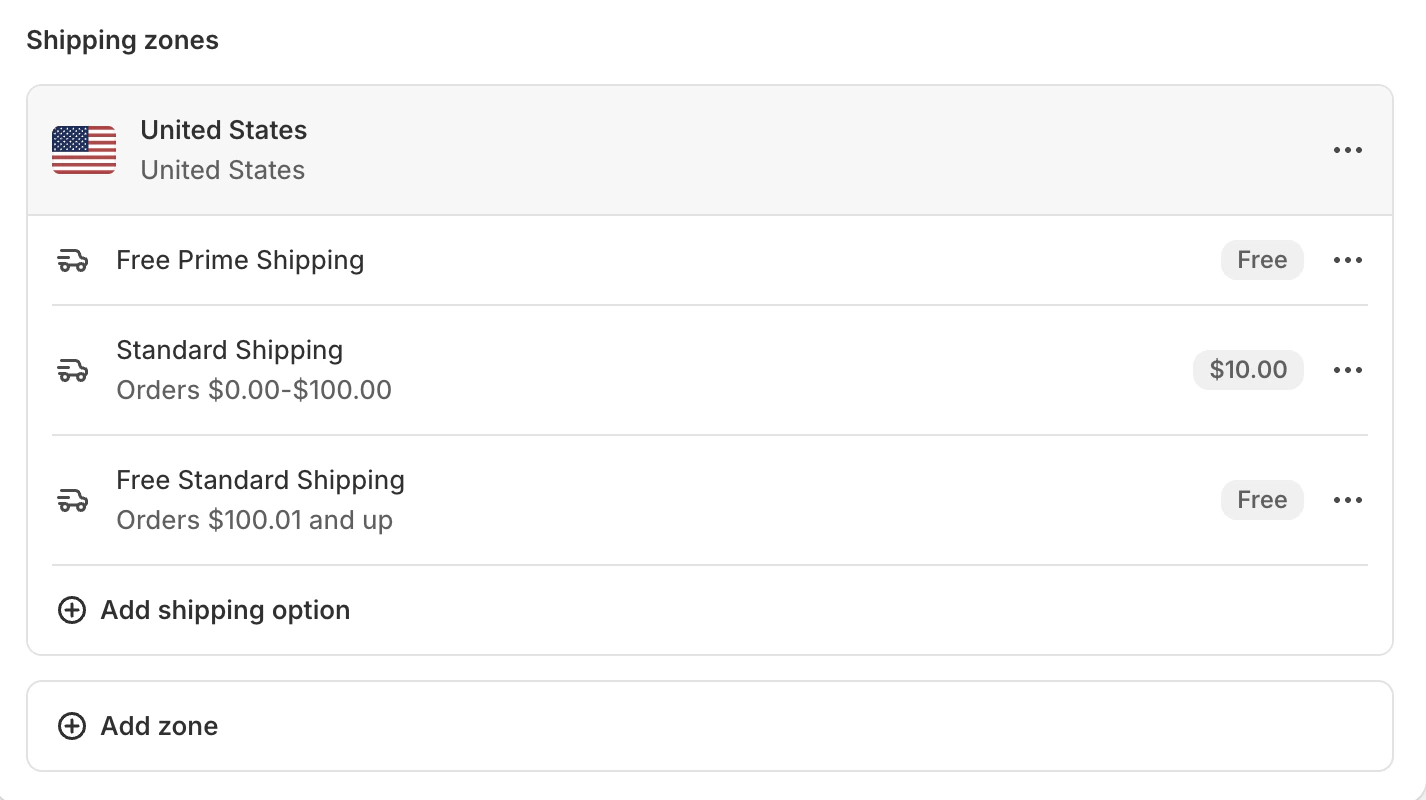 Now, let's create customizations in the app to show "Free Prime Shipping" to only "prime" customers and Standard Shipping options to regular customers.
From the left navigation panel, open the **Shipping Customizations** page.\
We’ll create two customizations here:
* One for **"prime" customers**
* One for **regular customers**
Click on "Create Customization" and add rule with following details:
```text theme={null}
Type: Only show specified shipping rates and hide rest
Name: Prime customers rule
Condition 1: Customer Tag <> Equals <> prime
Show the following shipping methods: Free Prime Shipping
```
Click "Done" and then "Save" the rule.
Click on "Create Customization" and add another rule with following details:
```text theme={null}
Type: Hide shipping rates
Name: Regular customers rule
Condition 1: Customer Tag <> Not Equals <> prime
Hide the following shipping methods: Free Prime Shipping
```
1. Go to your Shopify storefront
2. Login using a customer with tag "prime"
3. Add products to cart and proceed to checkout
4. Enter the complete address. First name should be **“shipmagic”** if app is in [test mode](https://shipmagic-docs.speedysquirrelhq.com/core-concepts/testing-the-app).
You should now see only the "Free Prime Shipping" option based on the rules we configured above.
**Need help?**
Our founders will personally help with the optimal setup for your brand. [**Book a free onboarding call**](https://cal.com/speedysquirrel/shipmagic-setup)\*\*\*\* if you’d like us to help.
Now, let's create customizations in the app to show "Free Prime Shipping" to only "prime" customers and Standard Shipping options to regular customers.
From the left navigation panel, open the **Shipping Customizations** page.\
We’ll create two customizations here:
* One for **"prime" customers**
* One for **regular customers**
Click on "Create Customization" and add rule with following details:
```text theme={null}
Type: Only show specified shipping rates and hide rest
Name: Prime customers rule
Condition 1: Customer Tag <> Equals <> prime
Show the following shipping methods: Free Prime Shipping
```
Click "Done" and then "Save" the rule.
Click on "Create Customization" and add another rule with following details:
```text theme={null}
Type: Hide shipping rates
Name: Regular customers rule
Condition 1: Customer Tag <> Not Equals <> prime
Hide the following shipping methods: Free Prime Shipping
```
1. Go to your Shopify storefront
2. Login using a customer with tag "prime"
3. Add products to cart and proceed to checkout
4. Enter the complete address. First name should be **“shipmagic”** if app is in [test mode](https://shipmagic-docs.speedysquirrelhq.com/core-concepts/testing-the-app).
You should now see only the "Free Prime Shipping" option based on the rules we configured above.
**Need help?**
Our founders will personally help with the optimal setup for your brand. [**Book a free onboarding call**](https://cal.com/speedysquirrel/shipmagic-setup)\*\*\*\* if you’d like us to help.